ネットワーク監視ソフトNagios3をインストール
ブログにも書いたが、ホームページを公開して以来我が家の光回線であるSTnetのPikaraから割り振られているIPアドレスがちょくちょく変化し、結果としてダイナミックDNSとの連係が一時的に切れる現象が出ている。
これではアクセスしようという気にならないのではと思い、一度どの位切れているかを定量的に把握したく、かってメルコのリンクステーションをハックして作っていたサーバーで運用していたNagiosを使ってみることとした。
Nagiosは定期的(デフォルト5分間隔)にpingを打ってくれてダイナミックDNSが上手く稼働しているかどうかを検知し、また統計的な集約も出来るのでうってつけである。
かって実施したインストールはソースからコンパイルしたが、今回は他のアプリケーションと同じでapt-get install でインストール出来るので簡単である。Nagiosには他に監視状況を表示させるためにApach2が必要となるが、既にインストールされている場合はNagios3だけでOKである。
sudo apt-get install nagios3
sudo apt-get install apache2
nagios3はインストール途中でnagiosadminのパスワードを聞いてくるので適当に入力する。これは/etc/nagios3/htpasswd.usersに保存される。
インストール後は各アプリケーションの設定を行う。
その前に監視の仕組みは
Nagiosは各ホストとhttpdなどのサービスのステータスを収集し、Apacheでそれを表示するというのが監視の流れにである。
Nagiosの設定ファイル等については
/etc/nagios3
以下にある。
このうち主となるconfigファイルは
/etc/nagios3/nagios.cfg
で、ここから他のconfigをファイル指定またはフォルダ指定で追加している構造となっている。
フォルダで指定した場合、読み込むのは末尾.cfgのファイルなので新規に作成したconfigファイルを読み込ませる際には忘れぬよう注意が必要である。
Nagiosをインストールした段階でNagiosサーバ自身=localhostへの監視は自動で始まってる。
それに使用されているconfigファイルは
/etc/nagios3/conf.d/localhost_nagios2.cfg である。
〇Nagios3
Nagiosの監視は対象ホストとそのホストで実施しているサービスである。
監視したいホストとサービスを拡張子をcfgとしたファイルで指定する。
デフォルトのnagios3が動いているホストの監視指定は以下の通りである。つまり、/etc/nagios3/conf.d/以下に拡張子cfgのファイルを置けば監視してくれる。
pi@wp-test:~ $ cat /etc/nagios3/conf.d/localhost_nagios2.cfg
# A simple configuration file for monitoring the local host
# This can serve as an example for configuring other servers;
# Custom services specific to this host are added here, but services
# defined in nagios2-common_services.cfg may also apply.
#
ホスト登録
define host{
        use                     generic-host            ; Name of host template to use
        host_name               localhost
        alias                   localhost
        address                 127.0.0.1
        }

# Define a service to check the disk space of the root partition
# on the local machine.  Warning if < 20% free, critical if
# < 10% free space on partition.
ホストに関するサービスの監視を登録
define service{
        use                             generic-service         ; Name of service template to use
        host_name                       localhost
        service_description             Disk Space
        check_command                   check_all_disks!20%!10%
        }


# Define a service to check the number of currently logged in
# users on the local machine.  Warning if > 20 users, critical
# if > 50 users.

define service{
        use                             generic-service         ; Name of service template to use
        host_name                       localhost
        service_description             Current Users
        check_command                   check_users!20!50
        parents                         localhost           ⇒ 上位hostを指定
        }
次に、statusmapで表示するアイコンを/etc/nagios3/conf.d/extinfo_nagios2.cfgで登録する。
ホスト表示に使うアイコンはサイズ40x40のgif,jpg,pngとユーティリティを使って作成するgd2タイプの画像を/usr/share/nagios3/htdocs/images/logos/以下に配置する。指定方法は以下の通りであり、設定した全てのホストに対応して指定しないとエラーとなる。
ここでGD2画像の作成方法は
$ sudo aptitude install libgd-tools でツールをインストールし、
$ pngtogd2 image.png image.gd2 1 1 で変換する。
アイコンの登録は以下の通り、/etc/nagios3//extinfo_nagios2.cfgで行う。
pi@wp-test:~ $ cat /etc/nagios3/conf.d/extinfo_nagios2.cfg
##
## Extended Host and Service Information
##

define hostextinfo{
        hostgroup_name   debian-servers
        notes            Debian GNU/Linux servers
#       notes_url        http://webserver.localhost.localdomain/hostinfo.pl?host=netware1
        icon_image       debian.png
        icon_image_alt   Debian GNU/Linux
        vrml_image       debian.png
        statusmap_image  debian.gd2
##      2d_coords        200,200
        }
define hostextinfo{
       host_name        blogserver
       notes            BlogServer
       icon_image       raspi.png
       icon_image_alt   Raspi
       vrml_image       raspi.png
       statusmap_image  raspi.gd2
##       2d_coords      450,50
}
〇apache2
/etc/apache2/apache2.confの最後に以下の内容を追記する。
Alias /nagios3/stylesheets /etc/nagios3/stylesheets
Alias /nagios3 /usr/share/nagios3/htdocs


  Options FollowSymLinks
  DirectoryIndex index.php index.html
  AllowOverride AuthConfig
  Order Allow,Deny
  Allow From All
  AuthName "Nagios Access"
  AuthType Basic
  AuthUserFile /etc/nagios3/htpasswd.users
  require valid-user


  Options +ExecCGI
これでapache2とnagios3を再起動すると監視が始まる。
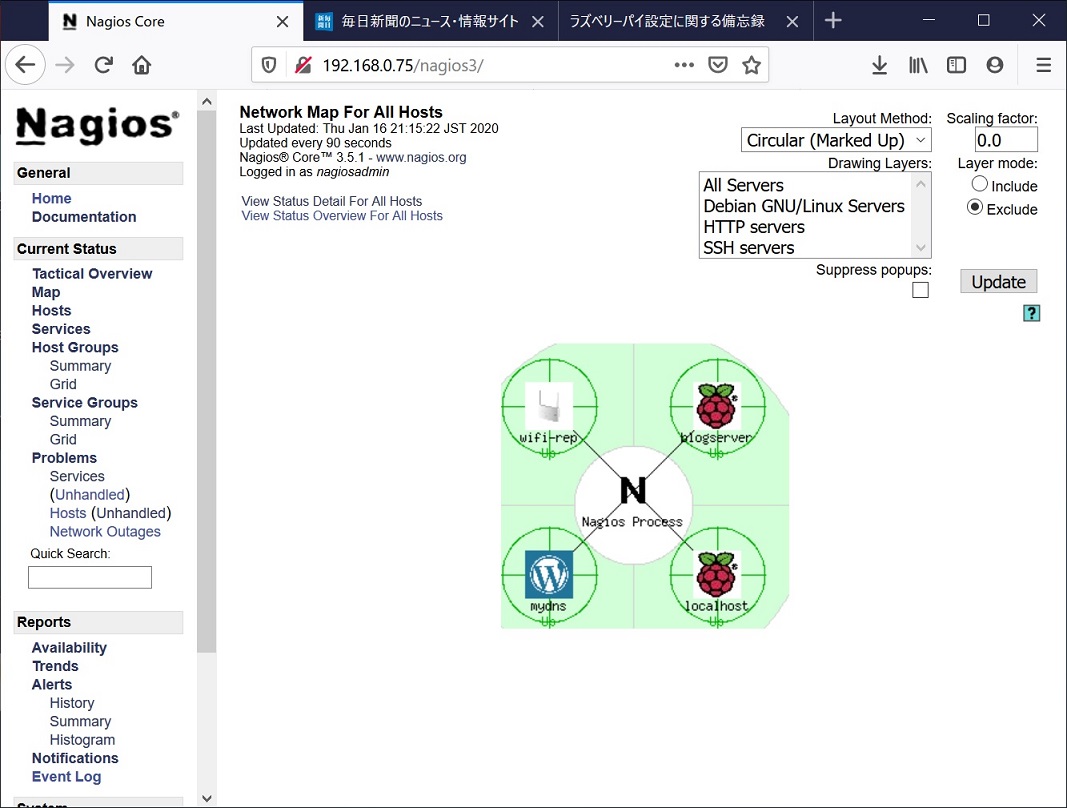
以下はステータスマップの様子。

